iTop Screen Recorder PRO
iTop Screen Recorder PRO is an easy-to-use screen recorder for Windows users. It adopts a GPU Hardware Acceleration Technology to provide a smooth HD recording experience.
iTop Screen Recorder PRO Review
iTop Screen Recorder is a newly launched product by iObit. The company is a recognized leader in the industry with more than 100 awards since 2004. For this review, we will describe the PRO version & its features in-depth so that you can decide whether it is worth the price.
User Interface & Ease of Use
The user interface is one of the most essential parts of any program because it’s the first thing the user sees as soon as run the program.
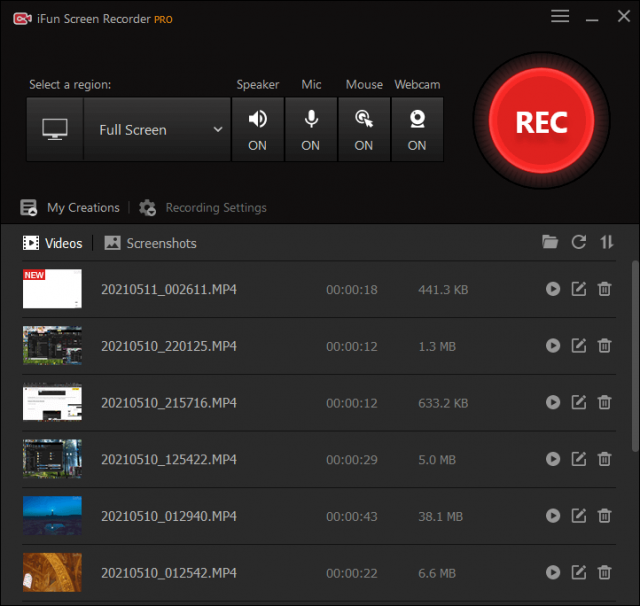
Main Interface after Some Screens Recordings
iTop Screen Recorder PRO has one of the easiest & beginner-friendly user interfaces. What we really like is everything has been perfectly packed into one window.
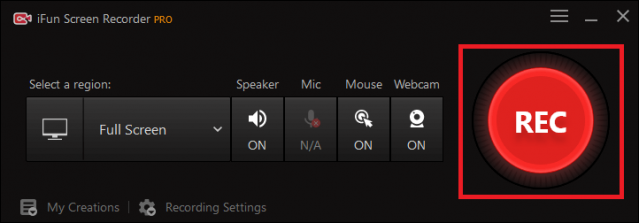
In the initial point, it has selected the full area of your screen. It will start recording as soon as you press the BIG Red REC button. There are four important buttons on the main window as well.
- Speaker: Turn on/off system sound during recording. If you turn off the system sounds won’t be recorded
- Mic: Turn on/off mic sound during recording. If you turn off the sounds from the mic won’t be recorded
- Mouse: Turn on/off curser during recording. If you turn it off the curser won’t be shown in the recording
- Webcam: You can turn on the webcam during recording. A webcam video of yourself will be added as an overlay.
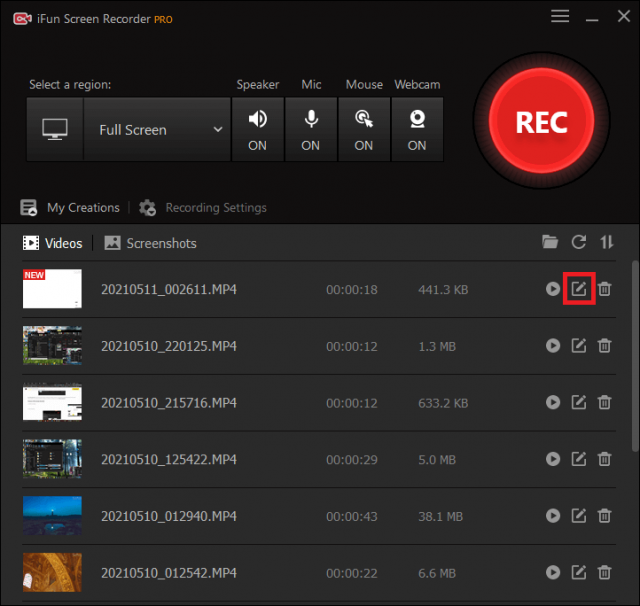
After you recorded some screens, It will show you all of the recordings on the main window. Topped one is the newest one. You can view the screenshots & screen recordings by switching between two tabs which are Videos & Screenshots.
Features of iTop Screen Recorder PRO
iTop Screen Recorder PRO comes with all the required features that a regular user need.
Flexible Screen Capture
You can select the area according to 3 options before you start the recording. The Full Screen mode will automatically select the entire screen. It also allows you to select fixed aspect ratios such as 4:3 & 16:9.
It has another option called Select Region that will intelligently select the area of the window you pick. But when we testing noticed that it’s not select the area accurately. However, you are able to adjust the width & height as you wish.
Further, iTop Screen Recorder PRO supports multiple displays & you can capture every detail and cut off every interference.
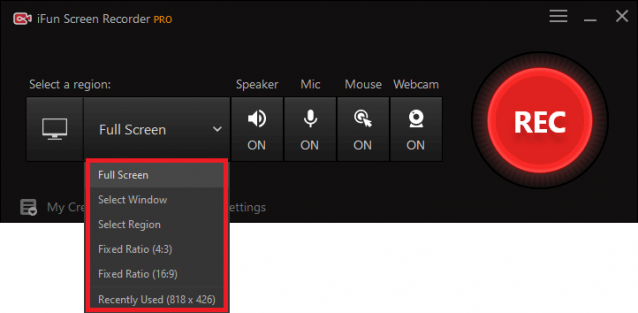
Recording Screen Size Settings
Add Facecam Overlay
iTop Screen Recorder PRO allows you to add a webcam video of yourself on the video that you are recording. You can go to settings > Webcam & select the webcam if you have many. It gives you a square shape image overlay & you can change the sizes as small, medium, & larger. It’s free to move & you can change the position as you wish.
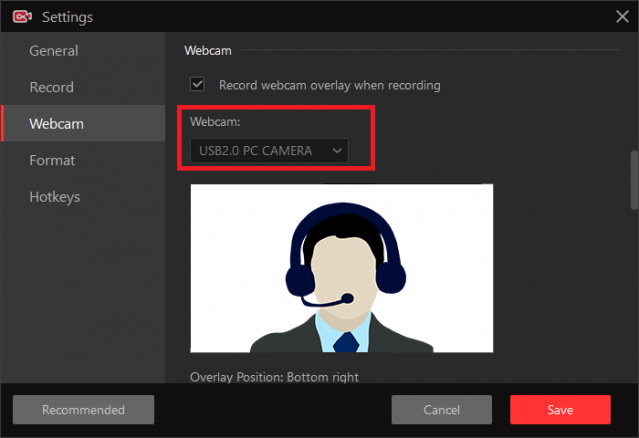
Webcam Settings
Take Screenshots during Recording
You can take screenshots during recording using the hotkey or pressing the capture button. We took some screenshots during playing a video without changing any settings. We are satisfied with them & it can take quality screenshots.

Taking Screenshots
Mix Your Own Voice during Recording
iTop Screen Recorder PRO can record the screen with audio from your microphone and speaker simultaneously. You are allowed to take different input combinations freely.
- Screen only
- Screen + System Audio only
- Screen + Your Voice only
- Screen + System Audio + Your Voice
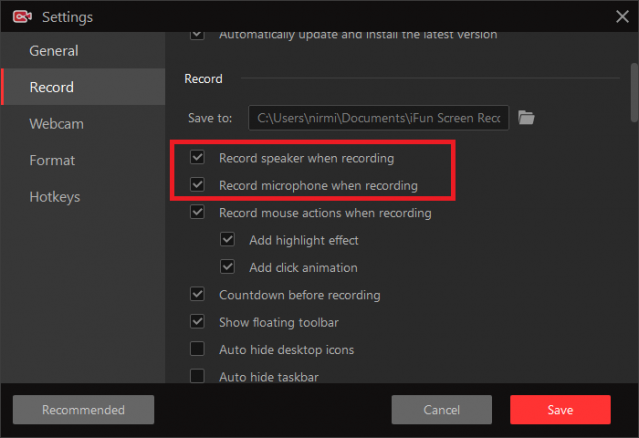
Audio Settings
Add a Watermark
It allows you to add a text watermark to your screen recordings. You can go to settings > Record & enter your text. It is also available on the home interface.
However, there are no options to change the watermark size or add an image watermark.
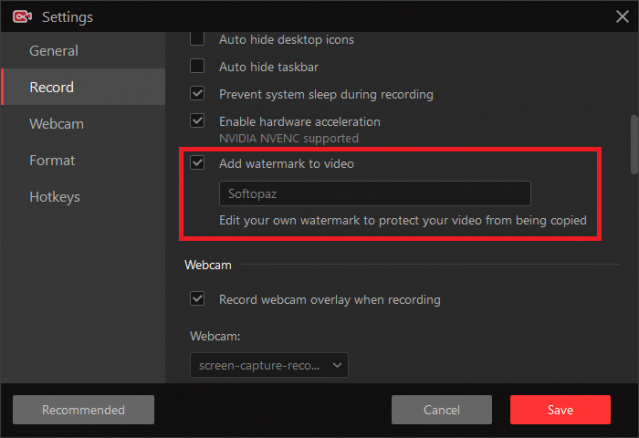
Watermark Settings
This is how watermarking looks like. We captured this during playing the video & you can watch the original video from here

iTop Screen Recorder PRO Screenshot Sample
Add Mouse Effects
If you go to settings > Record, there are options to add mouse click effects. It will highlight the cursor and adding animation to the mouse click actions.
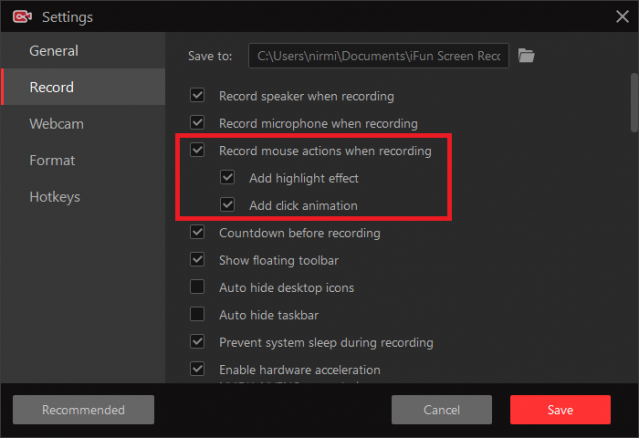
Mouse Effects Settings
Shortcuts
It comes with 3 shortcuts. If you need to change them, go to settings > Hotkeys, delete the current key & press your new key.
- Start/Stop Recording: F9
- Pause/Resume Recording: F10
- Take a Screenshot: F11
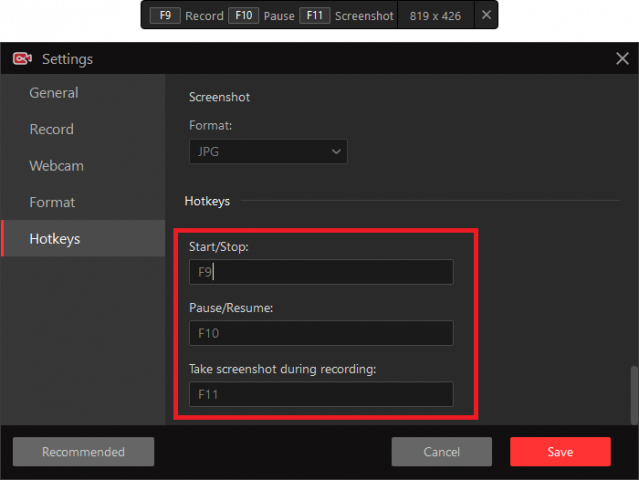
Hotkey Settings
Edit Before Saving
iTop Screen Recorder PRO also has a basic video editor that allows you to trim the recordings before you save them. You can cut & remove unnecessary start/end of the recordings.
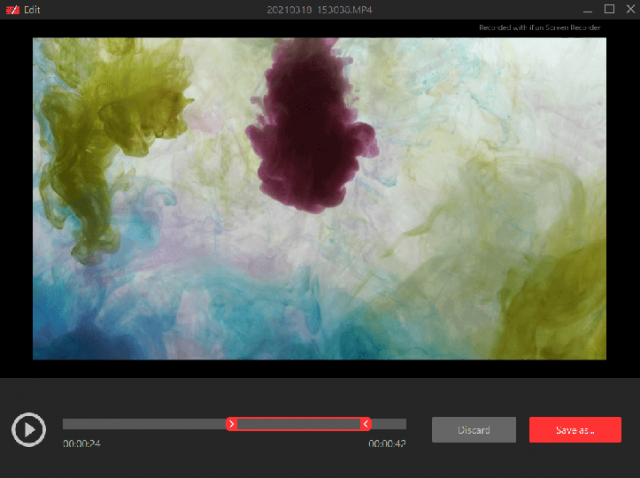
Trim the Record before Saving
Supported Output Formats
iTop Screen Recorder PRO supports a range of file formats to save output recordings. Some important settings to change formats can be seen on the main interface. But if you go to settings > Format, you will see all settings that are relevant to file formats.
- Video Formats: MP4 / AVI / FLV / MKV / MOV / TS / GIF
- Audio Formats: mp3 / AAC / AC3 / FLAC / WMAW2
- Screenshot formats: JPG / PNG / BMP
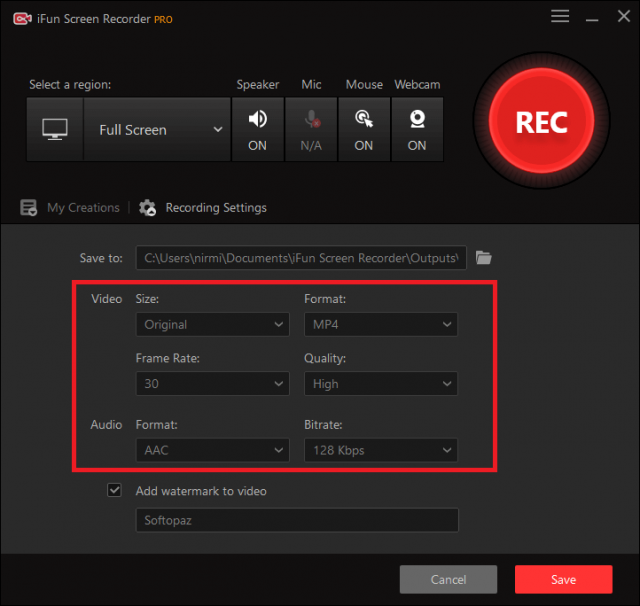
Output Format Settings
No Lagging during HD Recording
iTop Screen Recorder PRO adopts a GPU Hardware Acceleration Technology to optimize the performance when recording videos. We noticed that its encoder is very good & it optimize the output file size really well. However, we did some movie recordings on Windows 7 PC & experienced some lagging.
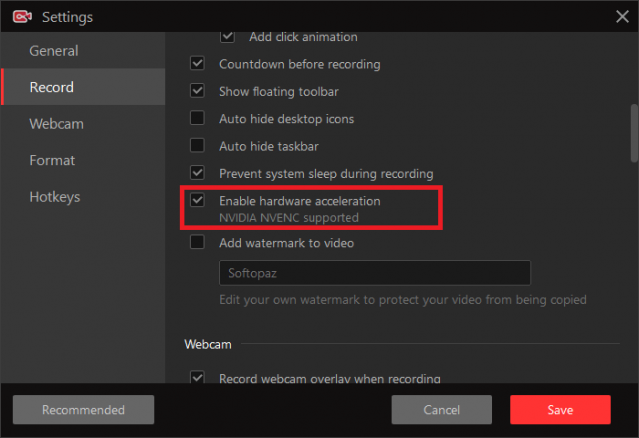
Enable Hardware Acceleration
Specification: iTop Screen Recorder PRO
| Supported Platforms | ||||||||
|---|---|---|---|---|---|---|---|---|
| ||||||||
| System Requirements (RECOMMENDED) | ||||||||
| ||||||||
| Features | ||||||||
| ||||||||
| Supported Output Formats | ||||||||
| ||||||||
Uses
iTop Screen Recorder PRO is ideal for almost all screen recordings. For your convenience, we’ll mention some example uses.
- Video Conference Recording
- Movie Recording
- Self-Made Tutorials Recording
- Music Recording
- Online Course Recording
- Game Recording
How to Use
Install iTop Screen Recorder PRO
Firstly, you need a license code. Will can provide a discounted price to buy a genuine license code. Go to the top of the page & buy first.
Download InstallerStep 01: Download the official installer using the above link
Step 02: Install the program.
How to Activate iTop Screen Recorder PRO?
Steps: Click on Hamburger Icon > Register, Enter your license code & click on Register
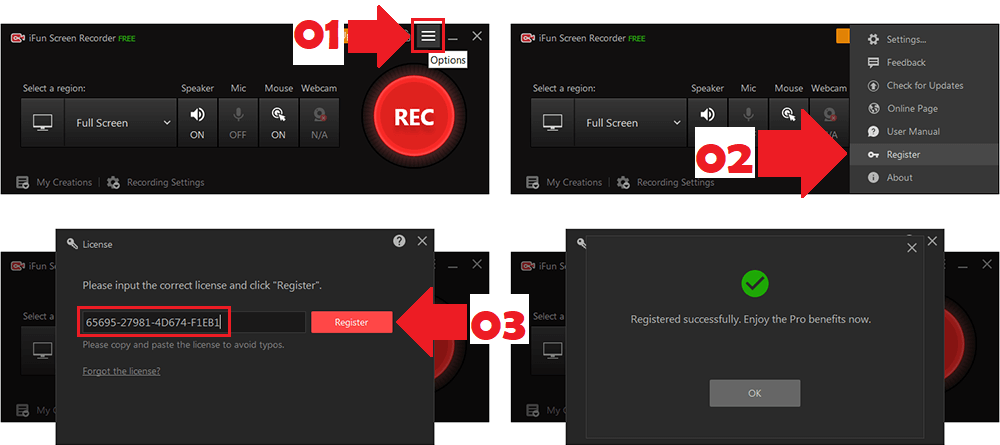
Activate iTop Screen Recorder PRO
How Record Your Screen with iTop Screen Recorder PRO?
Step 01: Run iTop Screen Recorder PRO. Default settings are ok but if you need you can change the video size, format, frame rate, quality, audio format, bitrate, etc… from the main interface.
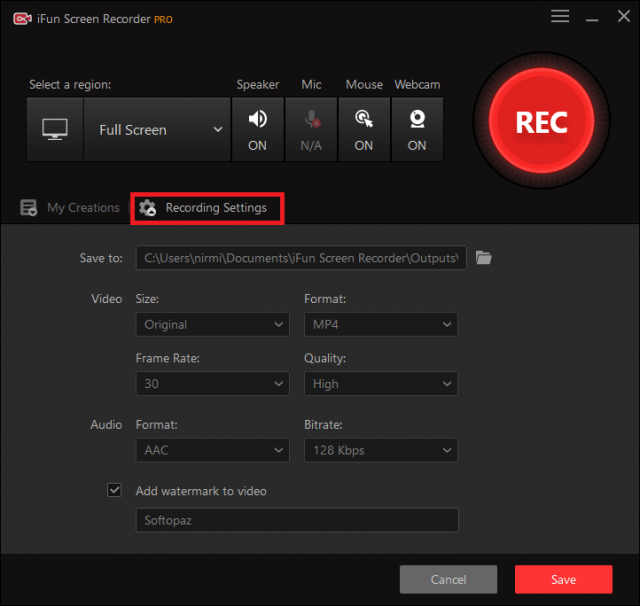
Change Settings before Recording
Step 02: As soon as you click the BIG Red REC button, the recording process will be started. You can use the hotkey as well.
Start Recording
Step 03: When you finish the recording it will save automatically. It will show you all the recorded videos under Videos tab. You can edit/trim recordings by clicking the edit icon.
Edit Recordings
Support
iObit offers good customer service. They provide email support & you can reach them from here if you have any questions about the product.
FAQs
1. Why there is no sound in my recording?
Firstly, you have to check the audio input device & make sure whether it is working. After that, make sure there is no headset connection to record the system sound. Turn on the microphone during screen recording & check whether the external sound can be collected.
2. Is iTop Screen Recorder PRO safe to use?
iTop Screen Recorder PRO is a screen recorder for Windows (PC) by iObit. The company has a reputation among people over decades. But you have to always make sure to download the installer from the official website or using our links. Because we are authorized partners of iObit. Further, we also did some scans of iTop Installer using VirusTotal.com. It’s completely safe to use & you can check the results from here.
3. What video formats are supported by iTop Screen Recorder PRO?
It supports multiple formats such as MP4, MKV, AVI, FLV, MOV, TS, GIF
4. Is iTop Screen Recorder free?
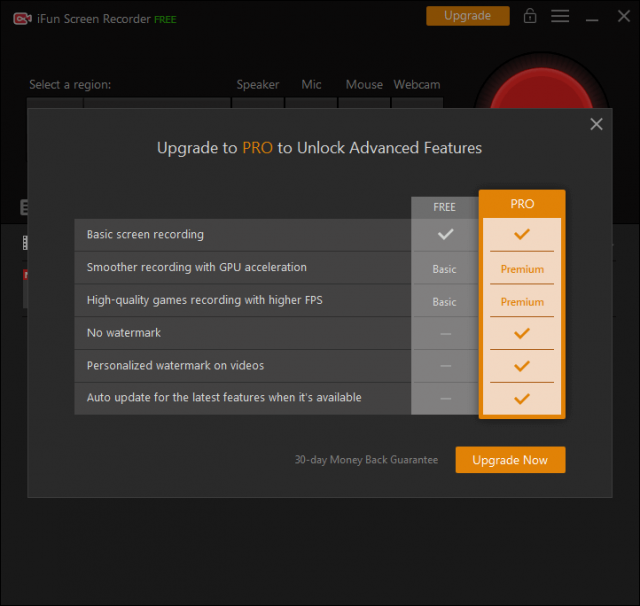
iTop Screen Recorder has a free version. But if you need to feel the power of it, you need to buy a license code. But don’t worry, we can give you a discounted price to buy a genuine license code. Just go to the top of the page & check the offers.
iTop Screen Recorder Free vs Paid
5. Can I record my webcam and screen at the same time?
Surely! You can add a webcam video of yourself to the video that you are recording. It’s useful primarily for instructional purposes, tutorials, and presentations.
6. Does iTop Screen Recorder have a watermark?
Yes, If you have the PRO Version you can change it by going Settings > Record, uncheck the “add a watermark to video”.
If you have the free version, it will add the text “Recorded with iTop Screen Recorder” into the top right corner of your recordings.
7. Does iTop Screen Recorder have a time limit on screen recording?
There is no time limit for recording in the Free or PRO version.
8. Is it illegal to screen record Netflix or Youtube?
You can technically record movies and videos, but it’s not allowed. If you read the terms of service of platforms such as Netflix & YouTube, they have mentioned it – that doesn’t necessarily mean it’s illegal, though 🙂
9. Will you be detected on some platforms during screen recording?
Well, It depends on the platform you are recording.
Ex: Snapchat still notifies users when a user records the privately messaged snaps, but some third-party apps can bypass this.


There are no reviews yet.